Careful!
You are browsing documentation for a version of Kuma that is not the latest release.
Looking for even older versions? Learn more.
DPs and Data Model
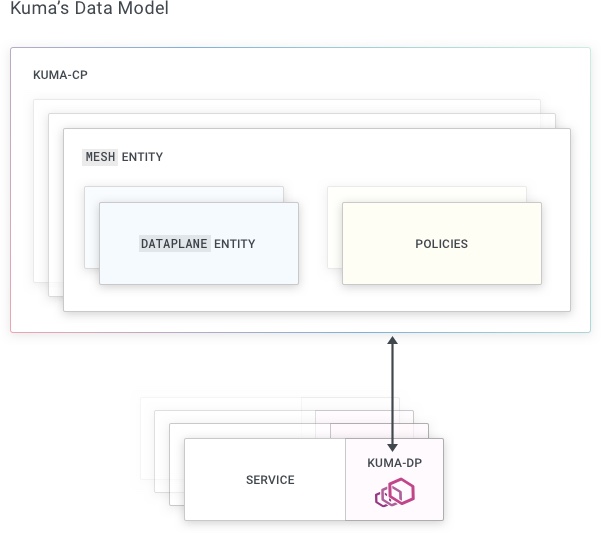
When Kuma (kuma-cp) runs, it waits for the data plane proxies to connect and register themselves.
Dataplane Entity
A Dataplane entity must be passed to kuma-dp when instances attempt to connect to the control plane.
On Kubernetes, this operation is fully automated.
On Universal, it must be executed manually.
To understand why the Dataplane entity is required, we must take a step back. As we have explained already, Kuma follows a sidecar proxy model for the data plane proxies, where we have an instance of a data plane proxy for every instance of our services. Each Service and DP will communicate with each other on the same machine, therefore on 127.0.0.1.
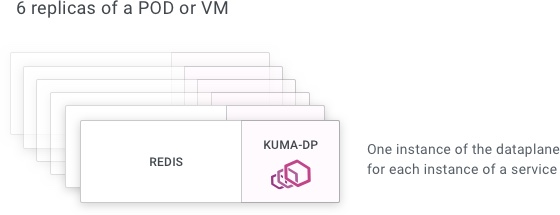
For example, if we have 6 replicas of a “Redis” service, then we must have one instances of kuma-dp running alongside each replica of the service, therefore 6 replicas of kuma-dp and 6 Dataplane entities as well.
Many DPs! The number of data plane proxies that we have running can quickly add up, since we have one replica of kuma-dp for every replica of every service. That’s why it’s important for the kuma-dp process to be lightweight and consume few resources, otherwise we would quickly run out of memory, especially on platforms like Kubernetes where multiple services are running on the same underlying host machine. And that’s one of the reasons Kuma leverages Envoy for this task.
When we start a new data plane proxy in Kuma, it needs to communicate a few things to the control-plane:
- What types they are: “standard”, “zone-ingress”, “zoneegress” or “gateway”.
- How they can be reached by other data plane proxies (This is an address/port combination).
- What services they expose (This will be called inbounds).
- How the application will use the sidecar to reach other services (either with transparent proxy or by explicitly listing services it will connect to).
There exists special types of data planes proxies:
- ZoneIngress which will enable inbound cross-zone traffic.
- ZoneEgress which allows isolating outgoing cross-zone traffic as well as any traffic going to external services available in local zone
- Gateway which will traffic external to the mesh to enter it.
Because these dataplane types are specific and complex we will discuss them separately to “standard” dataplane proxies.
To do this, we have to create a file with a Dataplane definition and pass it to kuma-dp run. This way, data-plane will be registered in the Control Plane and Envoy will start accepting requests.
Remember: this is all automated if you are running Kuma on Kubernetes!
The registration of the Dataplane includes three main sections that are described below in the Dataplane Specification:
addressIP at which this dataplane will be accessible to other data plane proxiesinboundnetworking configuration, to configure on what port the data plane proxy will listen to accept external requests, specify on what port the service is listening on the same machine (for internal DP <> Service communication), and the Tags that belong to the service.outboundnetworking configuration, to enable the local service to consume other services.
In order for a data plane proxy to successfully run, there must exist at least one Mesh in Kuma.
By default, the system generates a default Mesh when the control-plane is run for the first time.
Envoy
kuma-dp is built on top of Envoy, which has a powerful Admin API that enables monitoring and troubleshooting of a running dataplane.
By default, kuma-dp starts Envoy Admin API on the loopback interface (that is only accessible from the local host)
and port is taken from the data plane resource field networking.admin.port. If the admin section is empty or port
is equal to zero then the default value for port will be taken from the Kuma Control Plane configuration:
# Configuration of Bootstrap Server, which provides bootstrap config to Dataplanes
bootstrapServer:
  # Parameters of bootstrap configuration
  params:
    # Port of Envoy Admin
    adminPort: 9901 # ENV: KUMA_BOOTSTRAP_SERVER_PARAMS_ADMIN_PORT
It is not possible to override the data plane proxy resource directly in Kubernetes. If you still want to override it, use the pod annotation kuma.io/envoy-admin-port.
Tags
Each Kuma data plane proxy is associated with tags - or attributes - that can be used to both identify the service that the data plane proxy is representing, they are also used to configure the service mesh with matching policies.
A tag attributes a qualifier to the data plane proxy, and the tags that are reserved to Kuma are prefixed with kuma.io like:
kuma.io/service: Identifies the service name. On Kubernetes this tag is automatically created, while on Universal it must be specified manually.kuma.io/zone: Identifies the zone name in a multi-zone deployment. This tag is automatically created and cannot be overwritten.kuma.io/protocol: Identifies the protocol that is being exposed by the service and its data plane proxies. Accepted values aretcp,http,http2,grpcandkafka.
The kuma.io/service tag must always be present.
Kubernetes
On Kubernetes the Dataplane entity is automatically created for you, and because transparent proxying is used to communicate between the service and the sidecar proxy, no code changes are required in your applications.
You can control where Kuma automatically injects the dataplane proxy by labeling either the Namespace or the Pod with
kuma.io/sidecar-injection=enabled, e.g.
apiVersion: v1
kind: Namespace
metadata:
  name: kuma-example
  labels:
    # inject Kuma sidecar into every Pod in that Namespace,
    # unless a user explicitly opts out on per-Pod basis
    kuma.io/sidecar-injection: enabled
To opt out of data-plane injection into a particular Pod, you need to label it
with kuma.io/sidecar-injection=disabled, e.g.
apiVersion: apps/v1
kind: Deployment
metadata:
  name: example-app
  namespace: kuma-example
spec:
  ...
  template:
    metadata:
      ...
      labels:
        # indicate to Kuma that this Pod doesn't need a sidecar
        kuma.io/sidecar-injection: disabled
    spec:
      containers:
        ...
In previous versions the recommended way was to use annotations. While annotations are still supported, we strongly recommend using labels. This is the only way to guarantee that applications can only be started with sidecar.
Once your pod is running you can see the dataplane CRD that matches it using kubectl:
kubectl get dataplanes <podName>
Tag generation
When Dataplane entities are automatically created, all labels from Pod are converted into Dataplane tags.
Labels with keys that contains kuma.io/ are not converted because they are reserved to Kuma.
The following tags are added automatically and cannot be overridden using Pod labels.
kuma.io/service: Identifies the service name based on a Service that selects a Pod. This will be of format<name>_<namespace>_svc_<port>where<name>,<namespace>and<port>are from the Kubernetes service that is associated with the particular pod. When a pod is spawned without being associated with any Kubernetes Service resource the dataplane tag will bekuma.io/service: <name>_<namespace>_svc, where<name>and<namespace>are extracted from the Pod resource.kuma.io/zone: Identifies the zone name in a multi-zone deployment.kuma.io/protocol: Identifies the protocol that was defined on the Service that selects a Pod.k8s.kuma.io/namespace: Identifies the Pod’s namespace. Example:kuma-demo.k8s.kuma.io/service-name: Identifies the name of Kubernetes Service that selects a Pod. Example:demo-app.k8s.kuma.io/service-port: Identifies the port of Kubernetes Service that selects a Pod. Example:80.
Direct access to services
By default on Kubernetes data plane proxies communicate with each other by leveraging the ClusterIP address of the Service resources. Also by default, any request made to another service is automatically load balanced client-side by the data plane proxy that originates the request (they are load balanced by the local Envoy proxy sidecar proxy).
There are situations where we may want to bypass the client-side load balancing and directly access services by using their IP address (ie: in the case of Prometheus wanting to scrape metrics from services by their individual IP address).
When an originating service wants to directly consume other services by their IP address, the originating service’s Deployment resource must include the following annotation:
kuma.io/direct-access-services: Service1, Service2, ServiceN
Where the value is a comma separated list of Kuma services that will be consumed directly. For example:
apiVersion: apps/v1
kind: Deployment
metadata:
  name: example-app
  namespace: kuma-example
spec:
  ...
  template:
    metadata:
      ...
      annotations:
        kuma.io/direct-access-services: "backend_example_svc_1234,backend_example_svc_1235"
    spec:
      containers:
        ...
We can also use * to indicate direct access to every service in the Mesh:
kuma.io/direct-access-services: *
Using * to directly access every service is a resource intensive operation, so we must use it carefully.
Universal
As mentioned previously in universal you need to create a dataplane definition and pass it to the kuma-dp run command.
When transparent proxying is not enabled, the outbound service dependencies have to be manually specified in the Dataplane entity.
This also means that with transparent proxying you must update your codebases to consume those external services on 127.0.0.1 on the port specified in the outbound section.
For example, this is how we start a Dataplane for a hypothetical Redis service and then start the kuma-dp process:
cat dp.yaml
type: Dataplane
mesh: default
name: redis-1
networking:
  address: 192.168.0.1
  inbound:
  - port: 9000
    servicePort: 6379
    tags:
      kuma.io/service: redis

kuma-dp run \
  --cp-address=https://127.0.0.1:5678 \
  --dataplane-file=dp.yaml
  --dataplane-token-file=/tmp/kuma-dp-redis-1-token
In the example above, any external client who wants to consume Redis will have to make a request to the DP on address 192.168.0.1 and port 9000, which internally will be redirected to the Redis service listening on address 127.0.0.1 and port 6379.
Note that in Universal dataplanes need to start with a token for authentication. You can learn how to generate tokens in the security section.
Now let’s assume that we have another service called “Backend” that internally listens on port 80, and that makes outgoing requests to the redis service:
cat dp.yaml
type: Dataplane
mesh: default
name:
networking:
  address:
  inbound:
  - port: 8000
    servicePort: 80
    tags:
      kuma.io/service: backend
      kuma.io/protocol: http
  outbound:
  - port: 10000
    tags:
      kuma.io/service: redis

kuma-dp run \
  --cp-address=https://127.0.0.1:5678 \
  --dataplane-file=dp.yaml \
  --dataplane-var name=`hostname -s` \
  --dataplane-var address=192.168.0.2 \
  --dataplane-token-file=/tmp/kuma-dp-backend-1-token
In order for the backend service to successfully consume redis, we specify an outbound networking section in the Dataplane configuration instructing the DP to listen on a new port 10000 and to proxy any outgoing request on port 10000 to the redis service.
For this to work, we must update our application to consume redis on 127.0.0.1:10000.
You can parametrize your Dataplane definition, so you can reuse the same file for many kuma-dp instances or even services.
Dataplane Specification
The Dataplane entity includes the networking and naming configuration that a data-plane proxy (kuma-dp) must have attempting to connect to the control-plane (kuma-cp).
This specification is useful mostly in Universal and for troubleshooting as on Kubernetes Kuma-cp will generate it for you.
The Dataplane entity includes a few sections:
type: must beDataplane.mesh: theMeshname we want to associate the data-plane with.name: this is the name of the data-plane instance, and it must be unique for any givenMesh. We might have multiple instances of a Service, and therefore multiple instances of the sidecar data-plane proxy. Each one of those sidecar proxy instances must have a uniquename.networking: this is the meaty part of the configuration. It determines the behavior of the data-plane on incoming (inbound) and outgoing (outbound) requests.addressIP address or domain name at which this dataplane will be accessible to other data plane proxies. Domain name will be resolved to IP in the control plane.inbound: an array of objects that determines what services are being exposed via the data-plane. Each object only supports one port at a time, and you can specify more than one objects in case the service opens up more than one port.port: determines the port at which other data plane proxies will consume the serviceserviceAddress: IP at which the service is listening. Defaults to127.0.0.1. Typical usecase is Universal mode, wherekuma-dpruns ina separate netns, container or host than the service.servicePort: determines the port of the service deployed next to the dataplane. This can be omitted if service is exposed on the same port as the dataplane, but only listening onserviceAddressor127.0.0.1and differs fromnetworking.address.address: IP at which inbound listener will be exposed. By default it is inherited fromnetworking.addresstags: each data-plane can include any arbitrary number of tags, with the only requirement thatkuma.io/serviceis mandatory and it identifies the name of service. You can include tags likeversion,cloud,region, and so on to give more attributes to theDataplane(attributes that can later on be used to apply policies).
gateway: determines if the data-plane will operate in Gateway mode. It replaces theinboundobject and enables Kuma to integrate with existing API gateways like Kong.tags: each data-plane can include any arbitrary number of tags, with the only requirement thatkuma.io/serviceis mandatory and it identifies the name of service. You can include tags likeversion,cloud,region, and so on to give more attributes to theDataplane(attributes that can later on be used to apply policies).
outbound: every outgoing request made by the service must also go thorugh the DP. This object specifies ports that the DP will have to listen to when accepting outgoing requests by the service:port: the port that the service needs to consume locally to make a request to the external serviceaddress: the IP at which outbound listener is exposed. By default it is127.0.0.1since it should only be consumed by the app deployed next to the dataplane.tags: traffic onport:addresswill be sent to each data-plane that matches those tags. You can put many tags here. However, it is recommended to keep the list short and then useTrafficRoutefor dynamic management of the traffic.
admin: determines parameters related to Envoy Admin APIport: the port that Envoy Admin API will listen to
For example:
type: Dataplane
mesh: default
name: { { name } }
networking:
  address: { { address } }
  inbound:
    - port: 8000
      servicePort: 80
      tags:
        kuma.io/service: backend
        kuma.io/protocol: http
  outbound:
    - port: 10000
      tags:
        kuma.io/service: redis